A Django Model Manager for Soft Deleting Records and How to Customize the Django Admin

posted on July 1st, 2009 by Greg Allard in Greg's Posts on Code Spatter

Sometimes it’s good to hide things instead of deleting them. Users may accidentally delete something and this way there will be an extra backup. The way I’ve been doing this is I set a flag in the database, deleted = 1. I wrote this code to automatically hide records from django if they are flagged.

Django allows developers to create model managers that can change how the models work. The code below was written to return only the undeleted records by default. I added two new methods in case I need to get some of the deleted records.

from django.db import models
 
class SoftDeleteManager(models.Manager):
    ''' Use this manager to get objects that have a deleted field '''
    def get_query_set(self):
        return super(SoftDeleteManager, self).get_query_set().filter(deleted=False)
    def all_with_deleted(self):
        return super(SoftDeleteManager, self).get_query_set()
    def deleted_set(self):
        return super(SoftDeleteManager, self).get_query_set().filter(deleted=True)

This is usable by many models by adding this line to the model (it needs a deleted field) objects = SoftDeleteManager()

This will hide deleted records from django completely, even the django admin and even if you specify the id directly. The only way to find it is through the database itself or an app like phpMyAdmin. This might be good for some cases, but I went a step further to make it possible to undelete things in the django admin.

Django has a lot of customization options for the admin interface (
this article has some more info on customizing the django admin). I wanted the queryset to be different in the admin, so I created a ModelAdmin to customize what is displayed. First I set it up to show a few more columns than just __unicode__ on the list of items and added a filter to help easily separate the deleted from the active.

from django.contrib import admin
 
class SoftDeleteAdmin(admin.ModelAdmin):
    list_display = ('id', '__unicode__', 'deleted',)
    list_filter = ('deleted',)
# this requires __unicode__ to be defined in your model

This can also be used by many models by adding this at the bottom of the models.py file:

from django.contrib import admin
from wherever import SoftDeleteAdmin
admin.site.register(MyModel, SoftDeleteAdmin)

The next thing to do was override the queryset method in the default ModelAdmin. I copied the code from the django source and changed it from using get_query_set to make it use all_with_deleted() which was a method added to the ModelManager. The following code was added to SoftDeleteAdmin.

    def queryset(self, request):
        """ Returns a QuerySet of all model instances that can be edited by the
        admin site. This is used by changelist_view. """
        # Default: qs = self.model._default_manager.get_query_set()
        qs = self.model._default_manager.all_with_deleted()
        # TODO: this should be handled by some parameter to the ChangeList.
        ordering = self.ordering or () # otherwise we might try to *None, which is bad 😉
        if ordering:
            qs = qs.order_by(*ordering)
        return qs

The list of objects in the admin will start to look like this.
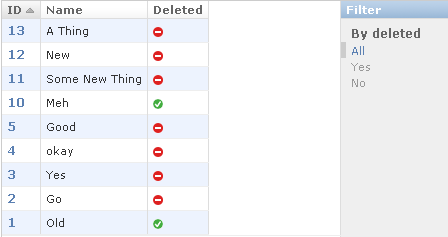
A screenshot of the django admin interface

A screenshot of the django admin interface

They are showing up there now, but won’t be editable yet because django is using get_query_set to find them. There are two methods I added to SoftDeleteManager so that django can find the deleted records.

    def get(self, *args, **kwargs):
        ''' if a specific record was requested, return it even if it's deleted '''
        return self.all_with_deleted().get(*args, **kwargs)
 
    def filter(self, *args, **kwargs):
        ''' if pk was specified as a kwarg, return even if it's deleted '''
        if 'pk' in kwargs:
            return self.all_with_deleted().filter(*args, **kwargs)
        return self.get_query_set().filter(*args, **kwargs)

With those updated methods, django will be able to find records if the primary key is specified, not only in the admin section, but everywhere in the project. Lists of objects will only return deleted records in the admin section still.

This code can be applied to a bunch of models and easily allow soft deletes of records to prevent loss of accidentally deleted objects.

Related posts:

  1. How to Display Realtime Traffic Analytics Users of Presskit’n have been asking for traffic statistics on…
  2. How to Write Django Template Tags Template tags can be useful for making your applications more…
  3. How to Write Reusable Apps for Pinax and Django Pinax is a collection of reusable django apps that…

Django Single Sign On or a Solution to Multi-domain Cookies

posted on June 18th, 2009 by Greg Allard in Greg's Posts on Code Spatter

I’ve been working on a project for a while and it has recently started to expand to an additional domain name. The domains will be using the same user base and I want to make it simple for users to be logged in at both applications. With a little research I dug up a few options I could go with. There is a redirect option, a javascript option, or a single sign on option.

With the redirect option I could redirect users to the main domain, check for cookies, and redirect them back so that they could get new cookies for the additional domain. The downside to this method is it will increase traffic for every pageload from a new visitor even if they will never need to log in. And since the sites this was for will have pages being viewed many more times than there will be logged in users, it wasn’t worth all of the extra traffic. It might be possible to minimize this traffic by only redirecting on login pages, but if the login form is at the top of all pages then it doesn’t help much.

Facebook uses a javascript method on all of the sites where you see facebook connect so you can use your facebook credentials to comment on blogs and other things. This method may be fine for their case, but again it will cause the extra traffic since the javascript is still connecting to the main server to get cookie info. I also don’t want to rely on javascript for my sessions.

I wanted a solution where it would only keep users logged in when they needed to be kept logged in. One way of knowing if they need to be kept logged in is: they are on one domain and click a link to go over to the other domain. Using a single-sign-on link to the other domain, the user would stay logged in at the new domain. The only use case that this doesn’t account for is someone is logged in at one domain and then types the other domain into the address bar. However that is a minimal case and I think the sso link will be the best way to keep users logged in most of the time and keep the overhead down.

I plan on open sourcing the django sso code so that other people can use it in their projects. It will allow a django site to accept single sign on requests and it will also help to create single sign on links to other sites. Both ends of the process don’t need to be a django site since it should work with other applications that use this type of process to authenticate users.

I’ll write a post on here about how to use the code once I get it set up at google code so if you are interested in that, you should probably
subscribe to the rss so you don’t miss it.

Related posts:

  1. Django Settings Site Domain example.com It took me a while to figure out how to…
  2. OpenID Enabled If you haven’t stumbled upon any sites that use OpenID…
  3. Python Projects in Users’ Home Directories with wsgi Letting users put static files and php files in a…

VIM as Python IDE | Alain M. Lafon

posted on May 31st, 2009 by PyromanX in Greg's Bookmarks on Delicious

VIM as Python IDE | Alain M. Lafon

posted on May 31st, 2009 by PyromanX in Greg's Bookmarks on Delicious

evserver – Google Code

posted on May 18th, 2009 by PyromanX in Greg's Bookmarks on Delicious

evserver – Google Code

posted on May 18th, 2009 by PyromanX in Greg's Bookmarks on Delicious

Designing a web framework: Django’s design decisions

posted on May 4th, 2009 by PyromanX in Greg's Bookmarks on Delicious

Pinax: a platform for rapidly developing websites

posted on May 4th, 2009 by PyromanX in Greg's Bookmarks on Delicious

How to Speed up Your Django Sites with NginX, Memcached, and django-compress

posted on April 23rd, 2009 by Greg Allard in Greg's Posts on Code Spatter

A lot of these steps will speed up any kind of application, not just django projects, but there are a few django specific things. Everything has been tested on
IvyLees which is running in a Debian/Ubuntu environment.

These three simple steps will speed up your server and allow it to handle more traffic.

Reducing the Number of HTTP Requests

Yahoo has developed a
firefox extension called
YSlow. It analyzes all of the traffic from a website and gives a score on a few categories where improvements can be made.

It recommends reducing all of your css files into one file and all of your js files into one file or as few as possible. There is a pluggable, open source django application available to help with that task. After setting up
django-compress, a website will have css and js files that are minified (excess white space and characters are removed to reduce file size). The application will also give the files version numbers so that they can be cached by the web browser and won’t need to be downloaded again until a change is made and a new version of the file is created.
How to setup the server to set a far future expiration is shown below in the lightweight server section.

Setting up Memcached

Django makes it really simple to set up caching backends and memcached is easy to install.

sudo aptitude install memcached, python-setuptools

We will need setuptools so that we can do the following command.

sudo easy_install python-memcached

Once that is done you can start the memcached server by doing the following:

sudo memcached -d -u www-data -p 11211 -m 64

-d will start it in daemon mode, -u is the user for it to run as, -p is the port, and -m is the maximum number of megabytes of memory to use.

Now open up the settings.py file for your project and add the following line:

CACHE_BACKEND = 'memcached://127.0.0.1:11211/'

Find the MIDDLEWARE_CLASSES section and add this to the beginning of the list:

    'django.middleware.cache.UpdateCacheMiddleware',

and this to the end of the list:

    'django.middleware.cache.FetchFromCacheMiddleware',

For more about caching with django see the
django docs on caching. You can reload the server now to try it out.

sudo /etc/init.d/apache2 reload

To make sure that memcached is set up correctly you can telnet into it and get some statistics.

telnet localhost 11211

Once you are in type stats and it will show some information (press ctrl ] and then ctrl d to exit). If there are too many zeroes, it either isn’t working or you haven’t visited your site since the caching was set up. See
the memcached site for more information.

Don’t Use Apache for Static Files

Apache has some overhead involved that makes it good for serving php, python, or ruby applications, but you do not need that for static files like your images, style sheets, and javascript. There are a few options for lightweight servers that you can put in front of apache to handle the static files.
Lighttpd (lighty) and
nginx (engine x) are two good options. Adding this layer in front of your application will act as an application firewall so there is a security bonus to the speed bonus.

There is this guide to
install a django setup with nginx and apache from scratch. If you followed
my guide to set up your server or already have apache set up for your application, then there are a few steps to get nginx handling your static files.

sudo aptitude install nginx

Edit the config file for your site (sudo nano /etc/apache2/sites-available/default) and change the port from 80 to 8080 and change the ip address (might be *) to 127.0.0.1. The lines will look like the following

NameVirtualHost 127.0.0.1:8080
<VirtualHost 127.0.0.1:8080>

Also edit the ports.conf file (sudo nano /etc/apache2/ports.conf) so that it will listen on 8080.

Listen 8080

Don’t restart the server yet, you want to configure nginx first. Edit the default nginx config file (sudo nano /etc/nginx/sites-available/default) and find where it says

        location / {
               root   /var/www/nginx-default;
               index  index.html index.htm;
        }

and replace it with

location / {
    proxy_pass http://192.168.0.180:8080;
    proxy_redirect off;
    proxy_set_header Host $host;
    proxy_set_header X-Real-IP $remote_addr;
    proxy_set_header X-Forwarded-For $proxy_add_x_forwarded_for;
    client_max_body_size 10m;
    client_body_buffer_size 128k;
    proxy_connect_timeout 90;
    proxy_send_timeout 90;
    proxy_read_timeout 90;
    proxy_buffer_size 4k;
    proxy_buffers 4 32k;
    proxy_busy_buffers_size 64k;
    proxy_temp_file_write_size 64k; 
}
location /files/ {
    root /var/www/myproject/;
    expires max;
}

/files/ is where I’ve stored all of my static files and /var/www/myproject/ is where my project lives and it contains the files directory.

Set static files to expire far in the future

expires max; will tell your users’ browsers to cache the files from that directory for a long time. Only use that if you are use those files won’t change. You can use expires 24h; if you aren’t sure.

Configure gzip

Edit the nginx configuration to use gzip on all of your static files (sudo nano /etc/nginx/nginx.conf). Where it says gzip on; make sure it looks like the following:

    gzip  on;
    gzip_comp_level 2;
    gzip_proxied any;
    gzip_types      text/plain text/html text/css application/x-javascript text/xml application/xml application/xml+rss text/javascript;

The servers should be ready to be restarted.

sudo /etc/init.d/apache2 reload
sudo /etc/init.d/nginx reload

If you are having any problems I suggest reading through
this guide and seeing if you have something set up differently.

Speedy Django Sites

Those three steps should speed up your server and allow for more simultaneous visitors. There is a lot more that can be done, but getting these three easy things out of the way first is a good start.

Related posts:

  1. Static Files in Django on Production and Development Update 2009-03-25 I realize why this isn’t needed. If your…
  2. Python Projects in Users’ Home Directories with wsgi Letting users put static files and php files in a…
  3. Setting up Apache2, mod_python, MySQL, and Django on Debian Lenny or Ubuntu Hardy Heron Both Debian and Ubuntu make it really simple to get…

How to Add Locations to Python Path for Reusable Django Apps

posted on April 10th, 2009 by Greg Allard in Greg's Posts on Code Spatter

In my
previous post I talk about reusable apps, but I don’t really explain it that much. If you have an app that might be useful in another project, it’s best to not refer to the project name in the application so you don’t have to search and remove it when adding to another project. To never refer to your project name in your app’s code, you will need to put your app on the python path. I usually do project_folder/apps/app_folder so apps will need to be a location that python is checking when you are importing so that importing looks like the following:

from appname.filename import foo

There are a few places you might need to add an apps folder to the pythonpath.

Add to settings.py

This will add the apps directory in your project directory to the beginning of the path list. This will allow manage.py syncdb and manage.py runserver to know that the apps folder should be added.

import os
import sys
PROJECT_ROOT = os.path.dirname(__file__)
sys.path.insert(0, os.path.join(PROJECT_ROOT, "apps"))

That should be all you need to do to get most django projects working with your reusable apps, but if for any reason you need add to the path with mod python or mod wsgi, the following should work.

Apache mod_python

In the
setting-up-everything post I show an example httpd.conf file. In your apache configuration you will probably see something similar to what is below. To add the location /var/www/myproject/apps to the PythonPath I added it in the list.

SetHandler python-program
PythonHandler django.core.handlers.modpython
SetEnv DJANGO_SETTINGS_MODULE myproject.settings
PythonOption django.root /myproject
PythonDebug On
PythonPath "['/var/www','/var/www/myproject/apps'] + sys.path"

Apache mod_wsgi

If you use mod wsgi instead of mod python, your apache config will be loading a wsgi file with a line like this WSGIScriptAlias /var/www/myproject/myproject.wsgi. You will need to edit that file to add to the path (django’s site has an
example file).

sys.path.append('/var/www/myproject/apps')

You never know when you might want to use an app in another project, so always try to keep from mentioning the project name anywhere in the applications.

Related posts:

  1. Python Projects in Users’ Home Directories with wsgi Letting users put static files and php files in a…
  2. How to Write Reusable Apps for Pinax and Django Pinax is a collection of reusable django apps that…
  3. Getting Basecamp API Working with Python I found one library that was linked everywhere, but it…